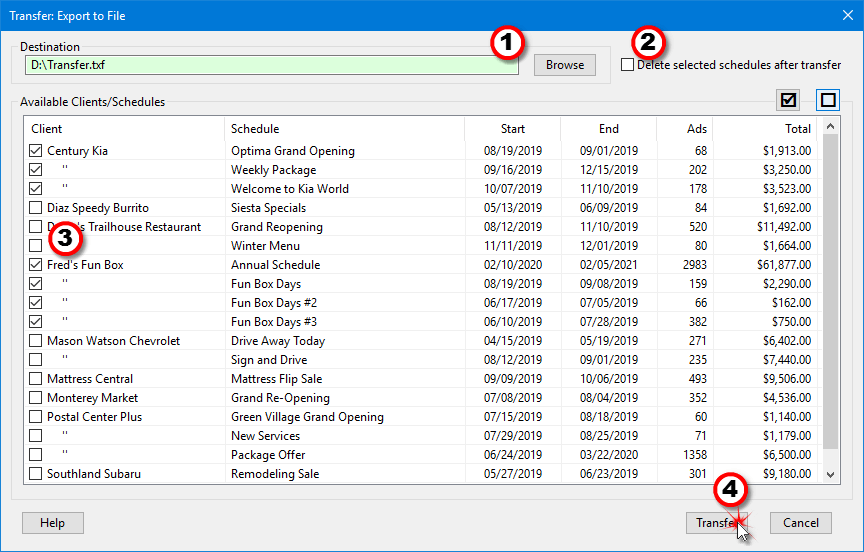
µThe first step of transferring one or more clients and/or schedules from one sales rep's PC to another is to create the export file. From SCOOTER Pro™ main menu, select Tools > Transfer Schedules > Export to File to display the following window.

Exporting Schedules to a Transfer File
1.Select the destination – Click the Browse button to select the drive and enter the name of the file to which the transfer information will be saved. It is not necessary to enter the ".txf" extension at the end of the file name, as SCOOTER Pro™ will add it for you. The destination drive can include a USB drive or any detachable media capable of accepting a file. This does NOT include CD drives.
2.Optionally choose to delete schedules after transfer – Check the box marked Delete selected schedules after transfer to have the transferred schedules removed from the current database. Only the schedules selected for transfer will be deleted if this box is checked. If this box is not checked, all transferred schedules will remain intact on the current PC.
3.Select schedules to transfer – Place a check mark next to each schedule to be transferred. Each client is listed once with additional schedules for the same client indicated by double quote marks. Any individual schedule can be selected irrespective of the others. In the example above, the "Sign and Drive" schedule for Mason Watson Chevrolet is checked for export even though it is not the first schedule for that client.
To select all the schedules listed, click the ![]() button on the upper right corner of the list. Clicking
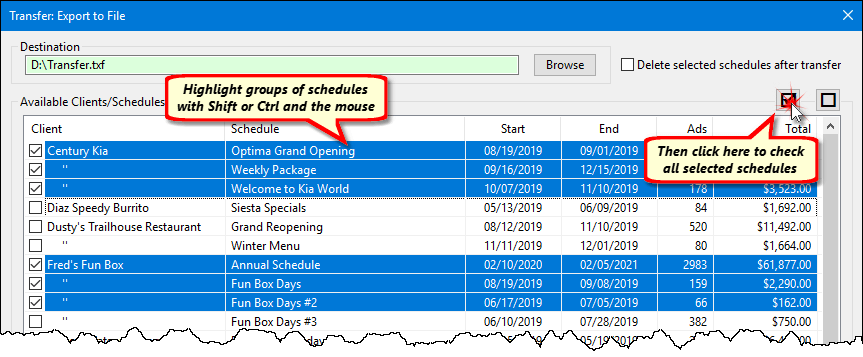
button on the upper right corner of the list. Clicking ![]() removes all check marks. The Shift and Control keys along with the mouse can also be used to highlight a group of schedules and then click
removes all check marks. The Shift and Control keys along with the mouse can also be used to highlight a group of schedules and then click ![]() to place a check mark in just those schedules that are highlighted. The same technique works with the
to place a check mark in just those schedules that are highlighted. The same technique works with the ![]() button to remove checks. If no schedules are highlighted, all of them will be checked or unchecked depending on which button is clicked.
button to remove checks. If no schedules are highlighted, all of them will be checked or unchecked depending on which button is clicked.

Using SmartSelect to Check Highlighted Schedules
4.Transfer the schedules – Click Transfer to create the transfer file. This file is in a special binary format that is readable only by SCOOTER Pro™.
If you have chosen to delete the selected schedules, you will be prompted to take a backup of the database before starting the transfer. We highly recommend you do take a backup as a precaution to protect your files in the event of a copying error.
Of necessity, when a schedule is copied, the client information is also copied, as it is possible the client information does not exist on the destination computer. When the delete option is selected, only the selected schedules will be deleted on the source computer; clients are never deleted during this process.
Once the file has been created, close this window and take the media containing the file to the computer that is to receive the schedule information. See Import from File.