µOnce an export transfer file has been created in SCOOTER Pro™ Transfer to File window, the resulting information can be imported to a second computer running the same version of SCOOTER Pro™. If the program versions are not identical, a message will alert you and the transfer will terminate.
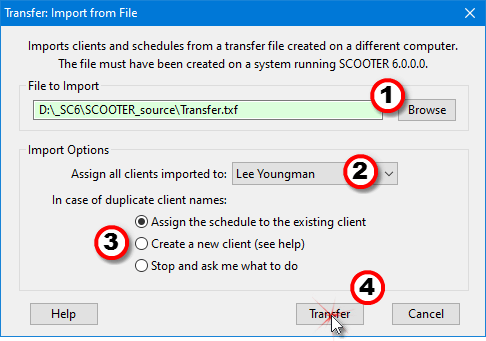
To begin the import, from the main menu choose Tools > Transfer Schedules > Import from File to display the following window:

Importing Transferred Schedules
1.Select the transport file – Use the Browse button to select the file that was created containing the schedules to be transferred.
2.Select the salesperson to be assigned – Only one salesperson can be selected. If there are multiple schedules for multiple salespeople, it will be necessary to create individual transfer files for each of them in turn. The selected salesperson will replace any existing salesperson assigned to the affected account, even if that account is already in the receiving computer's database.
3.Handling duplicate client names – It is possible that the clients being imported will already exist on the target computer. There are three options available to deal with such a situation:
•Assign the schedule to the existing client – This is the default — and probably best — choice. If a client with the identical name exists on the target computer, the incoming schedule will be assigned to that client. Only the assigned salesperson will be altered (if necessary). If the incoming client does not exist, it will be created with all the identical information that was on the computer where the file was created. As a precaution, it's best to check the spelling of the client names on both computers — the one you're transferring from and transferring to — in order to ensure they match up exactly.
•Create a new client – If this option is selected and a client with the same name is present on the target computer, a new client with a number appended to the client name will be created. "Bob's Diner" would be created as "Bob's Diner - 1" and all imported schedules would be stored under that name.
•Stop and ask me what to do – If this option is selected, any conflict will display a window resembling the following:

Manually Handling a Transfer Conflict
Here you can select any of the options outlined above for each conflict individually. This means you can have some schedules added to an existing client while others will create a new client. However, this process can become tedious with a large number of schedules being transferred. You also have the option at any time to apply your choice to all future conflicts for this transfer session. So, if you become tired of selecting the same option over and over, check the box Do this for all future conflicts this session and the window above will no longer appear with each conflict.
4.Begin the transfer – Click the Transfer button to begin the process of importing the clients and schedules. You will be prompted to take a backup of your data before proceeding. As the prompt window will indicate, we STRONGLY recommend a backup always be taken. This can save much agony should anything go awry during the transfer process. Failure to take a backup is inviting complete disaster, just what you don't need during your busy broadcast day.
A message will appear once the transfer is complete indicating how many schedules were added to the database as a result of the transfer.