SCOOTER's Database Manager provides a convenient method of viewing all the clients, agencies, and sales reps on file in the database. All can be edited and those that are inactive can be deleted from the Database Manager window. Open the Database Manager window by selecting Tools > Database Manager from the main window.
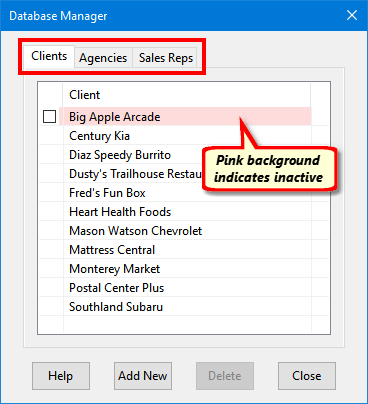
Database Manager
The manager window has three tabs: Clients, Agencies, and Sales Reps. Click on any tab to view a list of each in the system. From there, entities (client, agency, sales rep) can be added, edited, or deleted. All three sections operate in a similar manner.
Items appearing with a pink background are inactive and may be deleted from the system. To delete, use the mouse to place a check mark next to all items to be deleted. Then, click the Delete button. You will be asked to confirm the action before deletion is complete.
Click Add New to create a new client/agency/rep. Double click with the left mouse button to edit. Any item in the respective list — even inactive items — can be edited by double clicking.
µNote that when operating in network mode, a sales representative designated as the network administrator cannot be deleted from the system, even if there are no schedules on file for that individual. On the other hand, deleting an inactive sales rep from in the Database Manager also deletes them from the network user list.
The Client Information window allows editing of all information associated with the selected client.
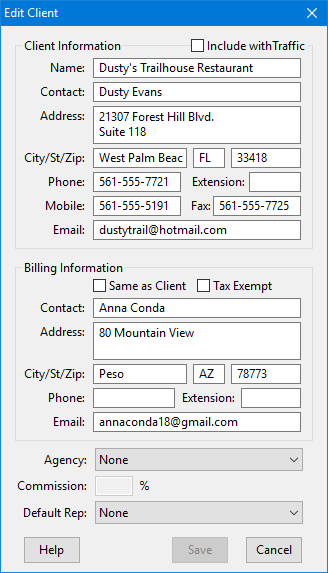
Edit Client Window
The Default Agency can be set from this window, along with the default Commission. If no default is specified, an agency selection can be made from the Schedule information window that will apply to the selected schedule only. If a default agency was previously assigned, it can be removed by selecting "None" from the drop down list.
The Default Rep for the client may also be set from this window. If a default rep was previously assigned, the default can be removed by selecting "None".
The Agency Information window allows editing of all information associated with the selected agency.
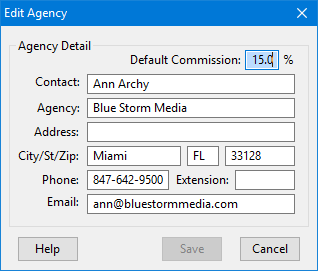
Edit Agency
Creating a new agency does not assign that agency to any client. Return to the Clients tab to make that assignment, if necessary. Note that any changes to an existing agency will immediately be reflected in all schedules where the agency is linked to any client. This avoids the requirement to manually update every schedule that includes a client using this particular agency.
There can be instances where an agency change can affect one or more client schedules. This could be due to a new agency picking up multiple clients from a competing agency, or an agency going out of business. Rather than making such a change schedule by schedule, use SCOOTER Pro™'s Agency Reassignment feature to deal with multiple changes at once.
On Database Manager's Agencies tab, highlight the agency where changes are required by left clicking it with the mouse. Then, right click on the selection to open the Agency Schedule Reassignment window.
Note: this feature is available only in SCOOTER Pro™ and requires there be two or more agencies existing in the database. If SCOOTER Pro™ is in network mode, only an administrator can access this feature.
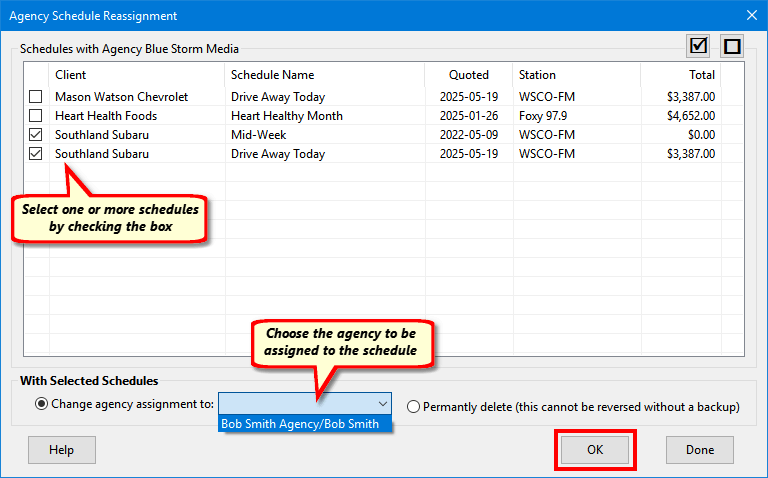
Agency Schedule Reassignment
The reassignment window lists all the schedules where the selected agency has been assigned. Use the left mouse button to place a check in the box next to each schedule to be assigned to a different agency. Next, select the agency to be assigned to the selected schedules from the drop down list next to the text Change agency assignment to:. Then, click OK to proceed.
The program will ask if you want to take a backup of your database before proceeding. If you answer "No", it will ask if you are certain about making the changes before proceeding. Without a backup, the changes made cannot be easily reversed.
A second option is to permanently delete the selected schedules. Usually, this is not a good idea. However, in some cases where an agency is changed the new agency might cancel the existing schedule with your stations. Use this option with caution.
Choosing the Sales Reps tab of the Database Manager allows new reps to be added, existing ones edited, and inactive reps to be deleted.
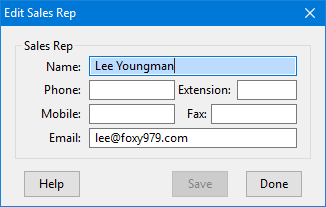
Editing a Sals Rep
As with agencies, creating a new sales rep does not assign that rep to any client. Return to the Clients tab to make a new rep the default rep for the client. This will assign the sales rep to that client for all new schedules created.
Adding New Names
New clients, agencies, or sales reps can be added to the system by clicking the Add New button after first selecting the Clients, Agencies, or Sales Reps tab. A window virtually identical to the Edit Client window will appear, however the Cancel button will display Done. The window will remain open allowing multiple clients, agencies or sales reps to be added, if desired. When the last one has been entered and saved, click Done to close the window.
After making any changes, click Save to make them permanent and close the edit window. Clicking Cancel also closes the window, but any changes will be lost.
Bulk Reassignment of Sales Reps
When turnover occurs in your sales force, it's common to assign existing or pending schedules to a different sales rep. However, changing the sales rep assignment individually by schedule can be daunting.
SCOOTER Pro™ allows selected schedules for a specified sales rep to either be assigned to a different sales rep, or the schedules can be deleted if no longer needed. This can be accomplished in the Database Manager's Sales Reps tab. In the list of sales reps, left click to highlight the rep who is no longer at the station, then right click the highlighted name with the mouse. This will display the Schedule Sales Rep Reassignment window.
Note: this feature is available only in SCOOTER Pro™ and requires there be two or more sales reps existing in the database. If SCOOTER Pro™ is in network mode, only an administrator can access this feature.
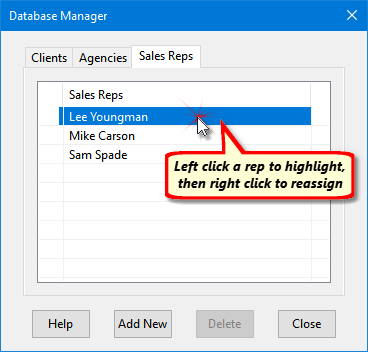
Selecting a Sales Rep to Change Assignments
The Sales Rep Reassignment window lists all the current schedules on file for the selected sales rep. To proceed, check the box next to each schedule to be transferred to another sales rep. The buttons showing a checked and unchecked box allows quick selection/deselection of all schedules listed.
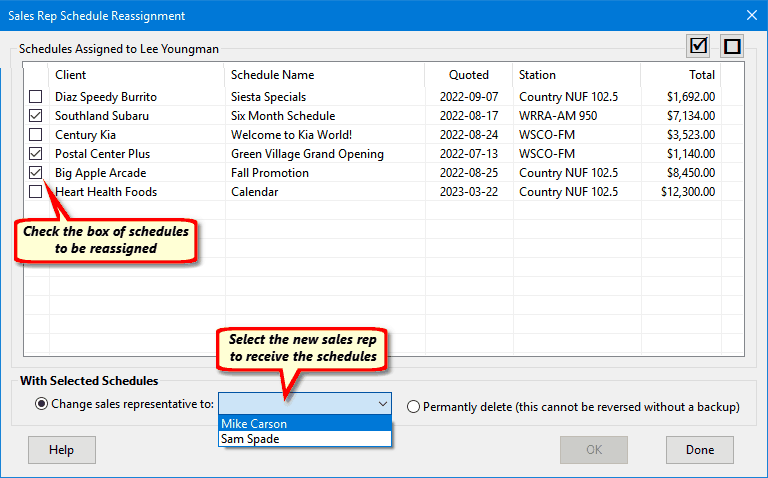
Changing Sales Rep Assignments
From the drop down list, select which sales representative is to receive the schedule assignment. Click the OK button to continue.
You will be given the opportunity to take a backup of your database before assignments are changed. Other messages walk you through a procedure if the backup fails for some reason, or you decide to abort the backup. These steps ensure you won't inadvertently modify or delete schedules by accident.
The list of schedules will refresh, now showing any remaining schedules assigned to the original sales rep. Assignments can continue to other sales reps, as necessary, until no more schedules remain to be assigned.
Deleting Schedules for a Specific Sales Rep
The Sales Rep Reassignment window can also be used to permanently delete schedules that were assigned to the selected sales rep, as outlined above. Click the button marked Permanently delete (this cannot be reversed without a backup) and then click OK to eliminate the selected schedules. As with the process above, you will be offered an opportunity to back up the database prior to any deletions.
Note that in no case will any client information be deleted. This utility only works with schedules.