µSchedule Status
In SCOOTER Pro™ the status of schedules can be adjusted to show their current condition. Some status levels are set by the program while others are set by the user.
The following chart outlines the status levels and how each appears on the schedule list in the main window:
Status |
Color |
Description |
|---|---|---|
Prepared |
White |
Schedule created but not yet presented to client |
Pending* |
Yellow |
Schedule quoted to client, no decision taken (set by program) |
Accepted |
Green |
Schedule accepted by client |
Declined |
Pink |
Schedule declined by client |
Expired* |
Red |
"Good for" time expired or Start Date reached (set by program) |
Schedule status colors are only displayed when the option Color code main window schedules by status is enabled in Program Options.
When a schedule is created it is automatically assigned Prepared status. This is changed to Pending commencing on the Quote Date. The Pending status continues through the "good for" period of days or until one of the following occurs:
•The schedule is approved by the client and the user manually sets the status to Accepted;
•The schedule is declined by the client and the user manually sets the status to Declined;
•The "good for" time period expires (quote date plus "good for days" or the schedule Start Date arrives, at which time the program sets the status to Expired.
For example, if the Quote Date is August 1 with a "good for" period of 7 days (which includes the quote date) the schedule converts to Expired on August 8 unless the client approves it or declines it. If a client asks for changes to the schedule, adjust the Quote Date to the date the schedule is resubmitted for consideration and this will prevent the schedule from premature expired status.
If the Start Date of the schedule arrives prior to the end of the "good for" period, the schedule is also considered Expired.
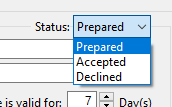
The status of a schedule can be changed from the Client & Schedule Info tab of the Schedule Information window by selecting the Status drop down list.
The status setting for schedules can also be changed simultaneously from the main SCOOTER Pro™ window (schedule view). Highlight one or more schedules using the mouse, then right click and select Change schedule status from the pop up menu. This will display the Set Status window.
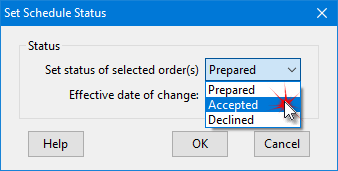
Set Status from Main Window
Select one of the available status levels (Prepared, Accepted, or Declined), then click OK to assign it to the highlighted schedules. The Effective date of change setting is not currently used and can be ignored. Click Cancel to close the window without altering the status of the highlighted schedule(s).
Any changes made are reflected immediately on the main program window.
The schedule Description is a unique name or identifier for the schedule. This should be something that is meaningful to the client (and to the sales rep) so the schedule can be located quickly when examining multiple schedules for a client.

Each schedule description must be unique for that client. For example, Client A can have only one schedule with the description "Annual Sale". However, Client A and Client B can each have a schedule with the description "Annual Sale". To differentiate between multiple variations on a schedule for the same client, use the description "Annual Sale #1", "Annual Sale #2", etc.
When SCOOTER generates a schedule, it inserts a title below the station logo(s), if used, and above the client's name. This title defaults to: "A Proposal for", but this default can be changed in SCOOTER Pro™ in the Schedules & Printing section of Program Settings.

In SCOOTER Pro™, the title can also be edited individually by schedule on the Client & Schedule Info tab of the Schedule Information window. Leave this field blank if no title is desired.
The schedule Quote Date is the date the proposed schedule will be presented to the client. This date defaults to the first Monday following the date the schedule was created. Click the triangle to the right of the date to open a drop down calendar to choose the desired date, or enter the month, day, and year directly.

The This quote is valid for nn days field (also known as the Valid Days or Good for Days) works with the Quote Date to set an expiration date for the prices offered in the schedule. Enter the number of days (0-60) or use the mouse to left-click the small arrows to increase or decrease the displayed number. Setting the number of days to zero disables the expiration date feature.
If the number of valid days would create a Good Until date that is later than the start of the schedule, the Good Until date will be adjusted to the schedule start date.
The Quote Date and valid days are used by SCOOTER Pro™ to color code schedules on the program"s main window (if that feature is enabled) and is also used to generate data for the Activity Report.
![]() Tip: If you have an old schedule you need to recycle, changing the Quote Date also updates the Start and End Date. For example, if you have a schedule from 2023 you want to bring to the current year, first copy it (leaving the original schedule intact). Open the copy and change the Quote Date to a date in the current year. SCOOTER will attempt to keep the Start Date and End Date on the same days of the week as the original schedule.
Tip: If you have an old schedule you need to recycle, changing the Quote Date also updates the Start and End Date. For example, if you have a schedule from 2023 you want to bring to the current year, first copy it (leaving the original schedule intact). Open the copy and change the Quote Date to a date in the current year. SCOOTER will attempt to keep the Start Date and End Date on the same days of the week as the original schedule.
See Performance Tips for additional reasons why you should use these features to help increase your sales.
The schedule Start Date and End Date specify the first and last dates ads can air. When a new schedule is created, the Start Date defaults to the first Monday following the Quote Date. Of course, the Start Date can be adjusted to any day after the Quote Date as desired. Note that SCOOTER displays the entire week of the Start Date regardless of which day ads begin.

The schedule End Date is initially set to the number of weeks after the Start Date as set in Schedules & Printing. For example, if schedules are set to default to two weeks and the schedule Start Date is January 1, the End Date will be preset to January 14. As with the Start Date, the End Date can be adjusted to any date that is equal to or later than the Start Date and not greater than 53 weeks in total length.
µChecking the Lock span box (SCOOTER Pro™ only) forces the program to always maintain the number of weeks/days in the schedule when the Start Date is adjusted. This allows the Start Date to be moved as needed and the End Date is automatically adjusted to keep the schedule length. So, with Lock span checked, if the Start Date of the previous example is changed from January 1 to January 8, then the End Date will automatically adjust to January 21. If the box is unchecked, adjusting the Start Date or End Date will cause the schedule length to expand or shorten accordingly.
When setting up a new schedule, the default span can easily be adjusted as needed, using the following steps:
•Make sure the Lock span box is not checked.
•Set the desired Start Date, then the End Date. This establishes a new span of weeks.
•Check the Lock span box, if desired. Now, changing the Start Date or End Date maintains the span of weeks.
If the client wants to later change the span by removing or adding weeks to the schedule, just remove the check from Lock span and adjust as desired.
When such a change occurs, any ads scheduled "slide" forward or back to the new weeks. See Modifying Schedules for more information.
SCOOTER Pro™ features an additional way to view and change schedule dates with the Adjust Schedule Dates window. This window is accessed by right-clicking with the mouse on either the Start Date or End Date fields.
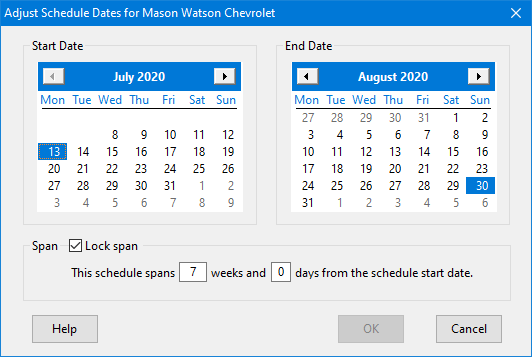
Adjust Schedule Dates
The window consists of three sections: a Start Date calendar, an End Date calendar, and the Span section. Changing any one of the sections alters the others to match.
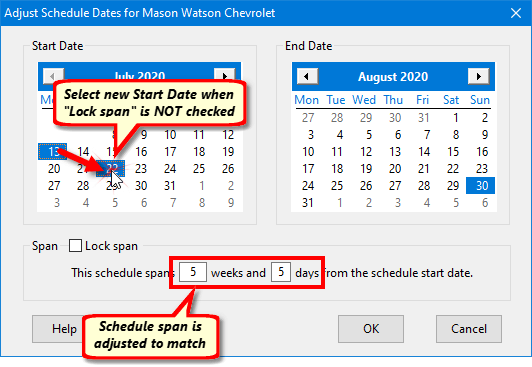
Adjusting Start Date Changes Schedule Length
With the Lock span box not checked, moving the Start Date calendar setting forward one week and two days changes the Span of the schedule from 7 weeks in length to 5 weeks/5 days. Changing the numbers in the Span section will adjust the End Date calendar, adding or decreasing days. When the Span numbers are adjusted, only the End Date calendar is changed, never the Start Date.
If the Lock span box is checked, changing the Start or End Date in the calendars does not change the length, or span, of the schedule; instead, the span value is maintained, with the End Date being adjusted as the Start Date is changed. The Lock span box inherits the setting of the Lock span box on the Schedule Information window. Checking Lock span in the Adjust Schedule Dates window also changes the box setting on the Schedule Information window.
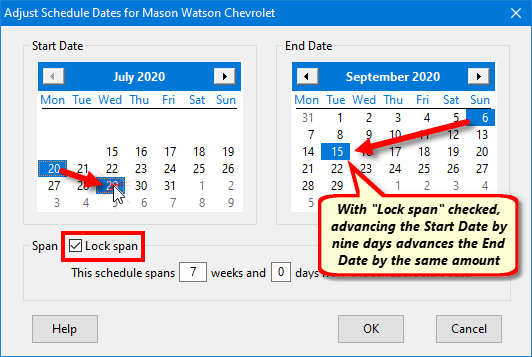
Adjusting Dates with "Lock span" Enabled
If the Adjust Schedule Dates window is used to modify a schedule with weekly or monthly package pricing, some prices could be lost. See Package Pricing for details.
Once all adjustments are complete, click OK to apply the changes and return to Schedule Information. Click Cancel to close the window and abandon any changes.
Every schedule created in SCOOTER must have at least one station assigned in order for the schedule to be saved to the program's database.
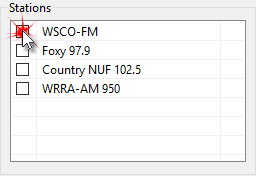
Selecting Stations
The free version of SCOOTER supports up to eight stations, while SCOOTER Pro™ can accommodate up to 30. Select the station(s) desired by checking the box in the Stations list next to each station's name.
When a schedule is created, all of the stations in the Stations list in the Stations & Logos section of Program Settings will be included for possible selection. If stations are added or removed from the master list, the stations on existing schedules will not be affected. A new schedule must be created in order to reflect such changes. This feature prevents schedules from becoming corrupted by referring to stations that have been removed from the master list.
Selecting multiple stations for a schedule will place each selected station's logo (if logos are being used) at the top of the first printed page of the schedule. A maximum of eight logos can be displayed on the printed page. Because of scaling issues and the shape of some logos, it is recommended to examine such multi-station schedules to ensure a pleasing appearance. If more than eight stations are selected for a schedule, SCOOTER disables logo printing for that schedule.
Package Options
Both stations and clients seem to like package pricing, and while SCOOTER offers a basic package feature, the package options for SCOOTER Pro™ are considerably more robust. See Package Pricing.
When a new schedule is created, it inherits the default print style setting. This default can be modified individually for each schedule as needed. See the topic Schedules & Printing for details.
The Weeks Active section displays all of the currently active weeks of the selected schedule. Double clicking any week in the list switches the display to the Schedule Detail tab and jumps to that week.
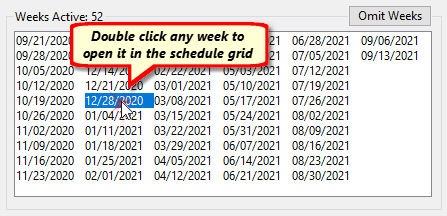
Weeks Active List
Some schedules span a number of weeks, and then skip or omit one or more selected weeks before resuming. The Omit Weeks button on the Schedule Information window allows weeks to be included or removed (skipped) in the schedule.
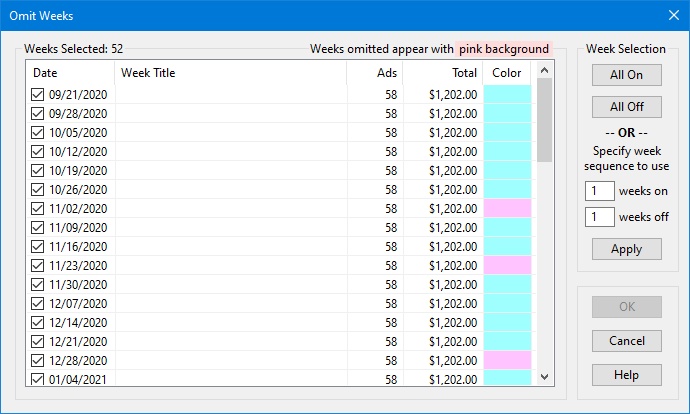
Omit Weeks Window
The Omit Weeks window lists all weeks in the schedule, with active weeks checked. Click on any check box with the left mouse button to remove the week from the schedule. Click a second time to restore it. Weeks not selected appear with a pink background.
This window provides additional features to speed the selection (or deselection) of weeks. The All On and All Off buttons turn select/deselect all weeks, respectively if no weeks have been highlighted. You can select one or more weeks by left clicking while holding down the Ctrl or Shift key, then click All On or All Off to change the status of the highlighted weeks only.
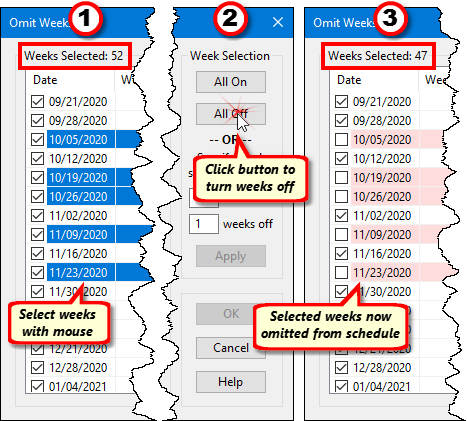
Omit multiple weeks from a schedule
The Specify week sequence to use section can also be used to specify a sequence of weeks on and weeks off. For example, entering a "1" in the weeks on box and a "1" in the weeks off box and then clicking Apply selects one week on/one week off for all weeks beginning with the first.
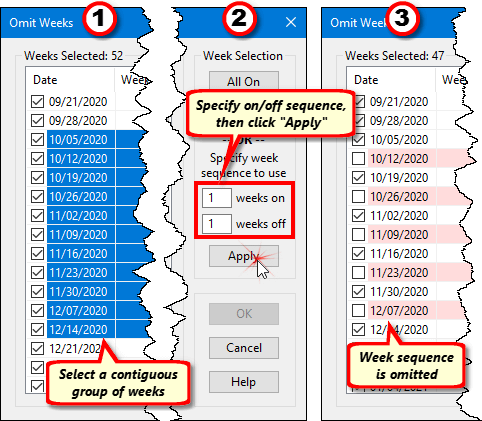
Applying a Week Sequence
If multiple contiguous weeks are highlighted using the mouse and Ctrl or Shift keys, the first highlighted week becomes the starting point for the sequence selection. Only highlighted weeks will have the sequence applied. In the example above, 11 weeks have been highlighted. When the Apply button is clicked, the 1 on/1 off sequence is applied only to the highlighted weeks. Note that the week of 12/14, while selected, remains "on" as the 1 week on/1 week off sequence ended with the week of 12/7 switched "off".
Using a combination of manual and sequence box methods, any arrangement of weeks for inclusion/exclusion can quickly be selected. Click OK to activate your selections, or Cancel to close the window without making any changes.
If you modify the selection assignment of weeks in a schedule with weekly or monthly package pricing, some prices could be lost. See Package Pricing for more information.
When you return to the Schedule Detail window and one or more weeks of the schedule have been omitted, the Omit Weeks button will contain an asterisk (*) to indicate this status.
It is important to recognize that a week that has been omitted is not really "gone"; it has just been "turned off". Any schedule information, including dayparts, ads, and rates is still on file. Should your client decide to restore a removed week, checking that week to "active" immediately restores the week to the schedule as though it had never been removed.