SCOOTER Pro™ requires one individual to oversee and supervise access to the network database. This individual is known as the network administrator. The following topics outline how to designate the network administrator and how access by other users is controlled.
First Time Log In as Administrator
IMPORTANT! When accessing the network for the very first time, the local database on the network server PC is copied to the server folder. It is this database that will be accessed by all users when logged on to the network. When in Local mode, the database resident on each individual machine is accessed and the network database is ignored.
The administrator must log in using the server host PC in order to access the network administrative functions. From the main menu, select Options > Database Selection... This will open the Connect to Database window.
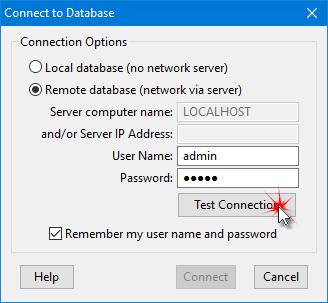
Testing Network Connection
Under Connection Options, choose Remote database (network via server). The Server computer name defaults to the computer name of the host PC, as SCOOTER Pro™ recognizes it is logging in via the server host machine. Because access is on the local PC and not a network client, both the Server computer name and Server IP Address fields are disabled.
For the initial log in fields for User Name and Password enter "admin" (omit quote marks). It is strongly recommended this default administrator user name and password be changed once access has been achieved.
It is not recommended for the administrator to enable the option Remember my user name and password, as this can possibly compromise network security, allowing anyone to log on as administrator.
Click the Test Connection button to verify connection to the server. SCOOTER Pro™ attempts to establish a connection to the server process and displays either a "Success" message or an error message indicating a problem in making a connection.
It might require several moments for the "Success" message to appear. Once it does, click Connect to complete the log on to the server. The Connect to Database window will close and return you to the main SCOOTER Pro™ window. Network connection can be verified by inspecting the status bar at the bottom of the window where "Network" will be displayed, along with the name of the current user. On the initial log in the User: field will be blank as the administrator has not yet been assigned.

Network Status Indicator
Each individual using SCOOTER Pro™ in network mode must be assigned a user name and password in order to log on to the network database. This is also true for the network administrator. Initially, the network administrator is unassigned and the default user name and password are both "admin".
To assign the network administrator and other users, select Tools > Administration from the SCOOTER Pro™ main menu. You will be prompted to enter your user name and password to gain access. Enter "admin" in both fields, then click Log In. Note that the Administration menu option is available only on the PC hosting the server.
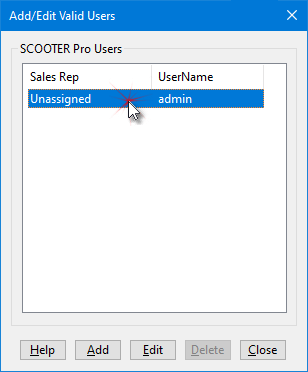
Designate Administrator
After logging in, the list of currently assigned network users is displayed. Initially, the system only recognizes "admin", which starts out unassigned. There might be a number of sales representatives on record in the database, but until they have been granted database access by the administrator, they will not appear on the list of SCOOTER Pro™ Users.
At this point, however, we want to link a "real" person with the administrator. To do this, double click the "Unassigned - admin" item in the list, or left click it to select it then click Edit. This will open the Add/Edit Valid Users window.
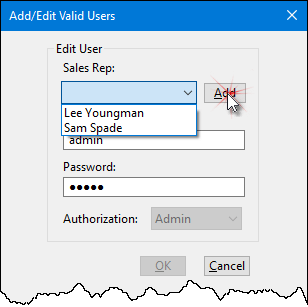
Adding a New User
In this example, there are two sales representatives recognized by the program; if one of them is going to be the administrator, select that name from the list. Here, we'll assume the person who is going to be administrator is not in the list, so we'll click Add to add a new user.
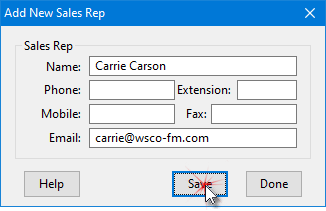
Adding a New Sales Rep
Once the new individual is added, they will appear in the drop down list of the previous window.
There are three steps in the administrator designation process:
1.Select a name from the Sales Rep drop down;
2.Enter a unique User Name (something other than "admin" is recommended but not required);
3.Enter a Password known only to the administrator (do not use "admin" as the password).
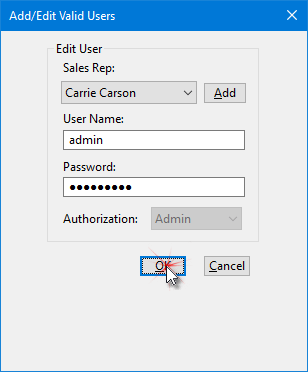
Administrator Designated
The Authorization drop down in this instance is disabled, as SCOOTER Pro™ recognizes the administrator is being designated. Only the administrator can be assigned the authorization level "Admin".
Once all settings are correct, click OK to apply them and close the Add/Edit Valid Users window. On the main program window, select Options > Log In As... from the main menu. In the window that appears, enter the new User Name and Password to log in as administrator.
On occasion it can become necessary to change the assignment of the network administrator. To accomplish this, take the following steps:
1.Select Tools > Administration from the main menu.
2.When logging in, if the administrator's user name and password are not known because of a change in personnel, these must be reset to allow the establishment of a new administrator. See the topic Reset the Administrator Access for more information.
3.From the list of SCOOTER Pro™ Users, select or double click the individual currently assigned as administrator. This will open Add/Edit Valid Users window. From the Sales Rep drop down, select the new administrator. If the new administrator is not in the list, click Add to add them.
4.With the new administrator selected, click OK to complete the assignment.
If the person replaced as administrator still requires access to the database, follow the procedure as outlined in Set Up Other Users.
Resetting Administrator Access
If, due to a change in personnel, the previous network administrator has not provided the necessary log in credentials, no one will be able to access the administrative tools to add or delete users and passwords. In addition, the previous administrator could access the network database remotely using his or her log in credentials.
The network administrator credentials can be "reset" to their default values by contacting On Top Systems, LLC at sysmail@ontopsystems.com or contacting us via the chat window at www.radio3k.com for a special reset code. This code is valid for a single use only and will only be released to authorized individuals.
In order to reset the network administrator, perform the following steps:
1.On the PC hosting the server, select Options > Log In As... from the main menu. If no one has log in credentials, select Options > Database Selection... from the main menu and choose Remote database (network via server).
2.In the Username field, enter "*reset*" (omitting the quote marks but DO include the asterisks).
3.In the Password field, enter the special, one-time use code provided by On Top Systems, LLC.
4.Click Log In.
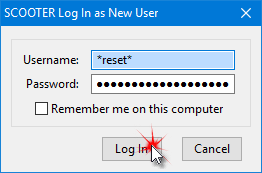
Reset Network Administrator
Following a successful reset, the admin user name and password are both reset to "admin". Choose Tools > Administration... from the main menu to display the Add/Edit Users window. Follow the instructions in Designating the Administrator to set up a new administrator user name and password. Again, it is important to NOT keep the default user name and password in order to maintain system security.
Each sales representative using SCOOTER Pro™ networked database, must have a network user name and password. These are created by the network administrator via the Add/Edit Valid Users window. This allows the administrator to control access to the database, "locking out" prior employees who otherwise would be able to continue use of the database via a WiFi connection.
To add or edit users, select Tools > Administration from the main menu, available only on the PC actually hosting the database server. Enter your administrator's user name and password, then click Log In to open the Add/Edit Valid Users window. In this example, "Carrie Carson" is the network administrator. To establish additional users, click the Add button. This will switch to the Add User dialog.
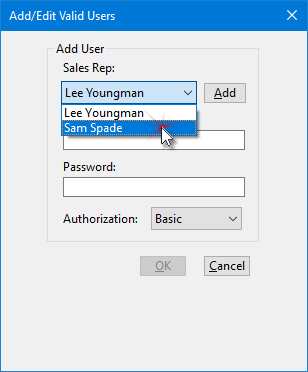
Selecting a Sales Rep to Add
Select an existing sales representative from the drop-down list, or click Add to create a new sales rep. Only sales representatives who have not been assigned network credentials will appear in the Sales Rep list.
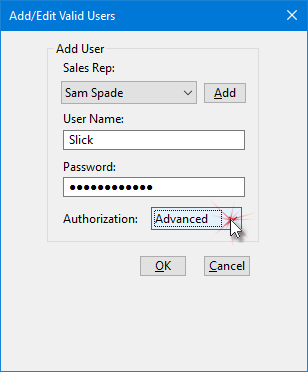
Selecting Authorization Level
Enter the desired user name and password. User names and passwords are case sensitive ("Bob" and "bob" are different names). User names must be unique.
Each user is assigned one of two authorization levels; Advanced or Basic. An "Advanced" user will see all schedules for all sales reps when logged on the network. "Basic" users see only schedules they have authored. (The administrator also has "advanced" access.) The authorization assignment can be edited for each user at any time.
Once all values have been specified, click OK to complete the assignment. The Add/Edit Valid Users window will reappear with the list of valid users updated.
Additional authorizations can be created or edited as desired. Click Close when all changes are complete.