µSCOOTER Pro™ allows the rows in a week's schedule to be manipulated by first highlighting one or more and then choosing the action to be performed.
Use the mouse to select the entire row or rows desired on the schedule grid for inserting, deleting, copying, or pasting. There are two ways to make your selections.
Method 1: Position the mouse pointer over the Daypart column, left click and hold, then drag the mouse all the way to the Total column. The selected block of row(s) will be highlighted. To remove the highlighted selection, left click anywhere on the schedule grid.
Method 2: Left click on the grid row number to alert the grid as to which row you want begin the selection. Hold down the Shift key and click the row number a second time to select (highlight) the entire row. Continue holding down Shift and left click the row number of the last row to be selected (if any). This will select (highlight) that row and all rows in between.
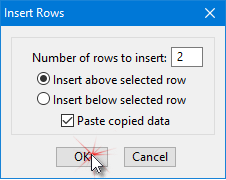
With one or more rows selected, right click anywhere on the grid. From the pop up menu, choose Insert, or from the keyboard press Ctrl + Ins (Insert). A dialog will appear asking how many rows are to be entered (the default will match the number of rows selected) and to insert above or below the selected row(s).
If a row or rows have previously been copied or cut from the grid, the check box Paste copied data will be enabled. Check this box to paste the previously copied rows into the rows being inserted. Leaving this box unchecked will insert blank rows in the schedule grid.
Click OK to complete the insert.

Inserting Rows
If inserting new, blank rows, remember to add a Daypart description before saving or moving to a different week. Inserted rows that remain blank will be deleted when the schedule is saved or switched to a different week.
Select one or more rows as outlined above, then right click the grid to display a pop up menu and select Delete Rows, or press Ctrl + Del (Delete) on the keyboard. Confirmation is required to complete the deletion. Any rows below the deleted row(s) will be closed up.
Selected rows can be copied and pasted in the schedule grid as desired. Copied rows can also be pasted to other weeks in the schedule.
Select one or more rows using the technique outlined above, then right click the grid and choose Copy Rows from the pop up menu, or press Alt + C on your keyboard (Ctrl + C is reserved for copying plain text). This will copy the contents of the selected row(s).
Next, select at least one row where the paste operation is to begin. The number of rows being pasted will correspond to the number copied. So if five rows have been copied and only one row is selected, that row and the four rows following it will all receive the paste.
If the paste operation will overwrite existing row data, a warning message will be displayed asking for permission to complete the paste.
The row order in which a week's schedule appears can be easily changed by highlighting a single row as described above, then use the up/down arrow keys on the keyboard to move the highlighted row up or down as desired. Only a single row at a time can be moved using this feature.