All the features of SCOOTER start and end with the Main Window. So let's take a look at this window and the various ways to put it to work for you.

SCOOTER Free Version Main Window
The free version of SCOOTER has a single main window divided into three sections:
1.Menu & Tool Bar: This is where you choose to add, edit, copy, and delete schedules, among other tasks.
2.Schedule List: All of the schedules created in SCOOTER are displayed here.
3.Status Bar: Displays information on the currently displayed schedules, as well as certain program information.
SCOOTER can maintain the number of schedules limited only by your computer's available hard drive space. Each schedule line on the main window displays an overview of the elements making up that schedule.
Schedule listings are initially arranged in alphabetical order by client. See Shortcuts & Hot Keys for different ways of ordering, locating, and accessing existing schedules.
Column widths can be adjusted by positioning the mouse pointer over the divider between column headers. When the cursor changes to a double pointed arrow, left click, hold, and drag the column to the desired width. The width you set persists from session to session.
SCOOTER Pro™ offers an enhanced main window with the option of color coding schedules by status and a filter to display schedules only within selected date ranges and/or status conditions. There is also an option to switch to a split-screen, client-centric view.

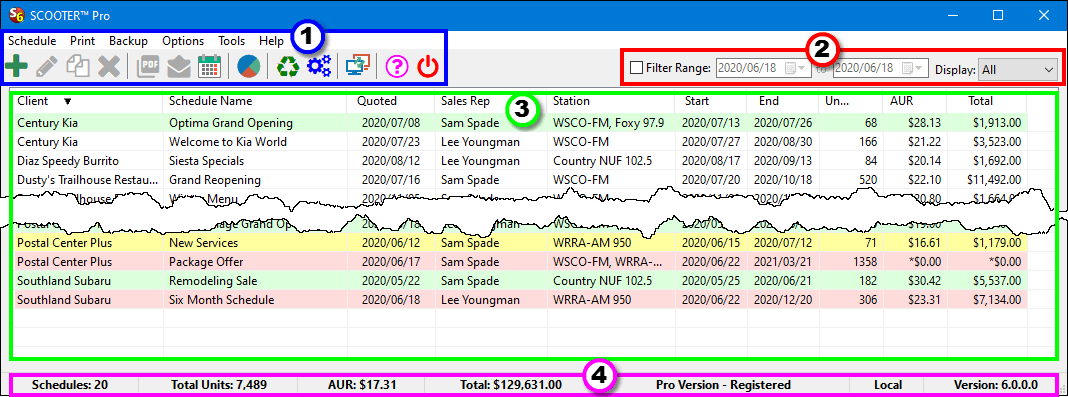
SCOOTER Pro Main Window
The SCOOTER Pro™ main window has the following sections:
1.Menu & Tool Bar: This is where you choose to add, edit, copy, and delete schedules, among other tasks.
2.Date and Status Filters: Optionally display only those schedules between two dates. Also optionally display schedules by status. These two filter options can operate in tandem or individually. See Filtering Schedules.
3.Schedule List: All* of the schedules created in SCOOTER are listed here.
4.Status Bar: Displays information on the currently displayed schedules, as well as certain program information.
*When in network mode, displayed schedules can be restricted by the administrator to only show those created by the user currently logged in.
SCOOTER Pro™ has all the features of SCOOTER Free plus the following additional features:
•Columns in the schedule list can be rearranged by clicking on any column header and dragging it to the desired position;
•Schedules can be optionally color coded:
▪White = prepared
▪Yellow = pending
▪Green = accepted
▪Pink = declined
▪Red text = expired
•Alter the status of one schedule or a selected group of schedules by right clicking with the mouse;
•Pressing F2 or clicking the Change view button ![]() on the tool bar alternates between the standard view and SCOOTER Pro™'s split window;
on the tool bar alternates between the standard view and SCOOTER Pro™'s split window;
•The Calendar button prints a broadcast calendar showing the client's schedule or a blank broadcast calendar for any given year.

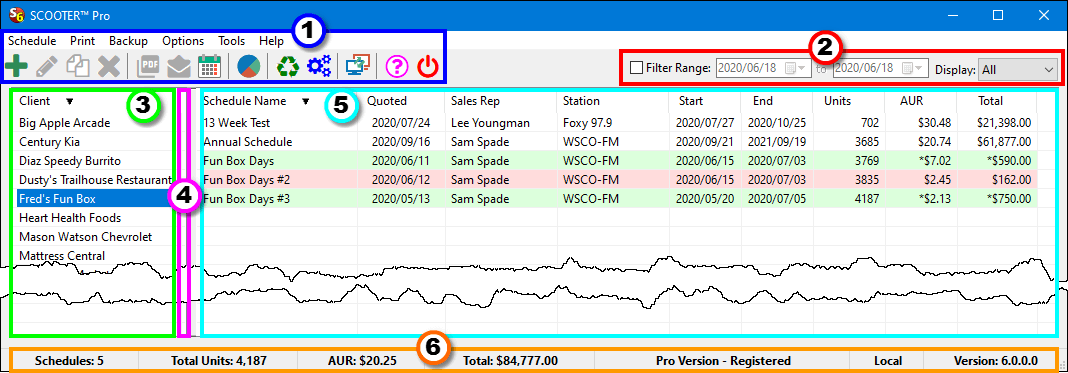
SCOOTER Pro Split View
The split window has the following sections:
1.Menu & Tool Bar
2.Date and Status Filters
3.Client List: Clients are listed alphabetically in the left pane. Click on the header to reverse the sort order. Double click any client to create a new schedule for that client.
4.Splitter Bar: (shown in purple) Left click and hold to drag the splitter bar, adjusting the width of the left and right panes.
5.Schedule List: When a client is selected on the left, all the schedules for that client are listed on the right. Quickly locate any schedule for a client without wading through a long list of schedules for other clients. Schedule lists can be limited by the administrator when in network mode.
6.Status Bar