µIn SCOOTER Pro™, each week of a schedule can optionally be assigned a color code to identify it based on user specifications. For example, weeks with "light" coverage can be given one color while "heavy" weeks another. Color coding can also be used to differentiate weeks before, during, and after a particular sale or event. Uses are limited only by your imagination.
In addition to color coding weeks of the schedule itself, those colors are also used on the optional Schedule Calendar at the end of the printed schedule. This allows the client to see the weeks he is active (as well as the weeks he is not) with the active weeks color coded to match the printed schedule. The calendar presents a visual display many clients find helpful.


Selecting a Week Color
Color Options
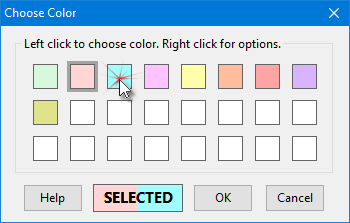
Right click any color box in the Choose Color window for a list of available options
•Copy color: Copies the current box color.
•Paste color: Pastes a previously copied color into the selected box. This allows an existing color to then be modified to a different hue without losing the original color.
•Select new color: Opens the Custom Color Selection window where a new color can be chosen that will replace the color in the selected box.

Custom Color Selection
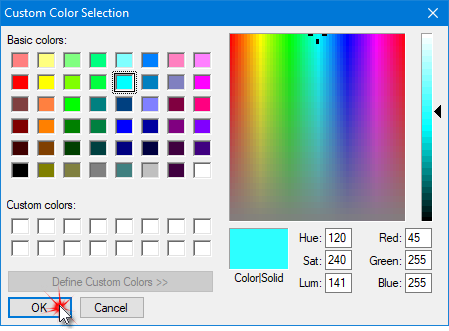
Using the mouse, select any of the Basic colors or use the rainbow box to select the color desired. Use the slider on the right side of the window to adjust the hue, keeping in mind that light pastel colors work best. Colors can also be adjusted by entering values in the text boxes on the lower right of the window. Text always prints in black over colors on printed schedules, so selecting a dark shade might render the text unreadable.
Click OK to complete the color assignment, or Cancel to close the window without changing the color.
•Copy selected color here: Places whatever color is in the SELECTED box in the clicked color box. Its a way to restore a previously selected color that might no longer be in the Choose Color window.
•Restore original colors: Replaces all user defined colors with the original, default colors established at the time of program installation.
Additional Week Color Options
Right click the Week Color box on the Schedule Detail tab to display a pop up menu with the following options:
•Copy to Matching Weeks: Selecting this option will copy the current week's color to all weeks of the schedule that match the current week in every respect (week title, dayparts, ads, totals, etc.).
•Color Code Manager: Opens the advanced options of the Color Code Manager.

Color Code Manager
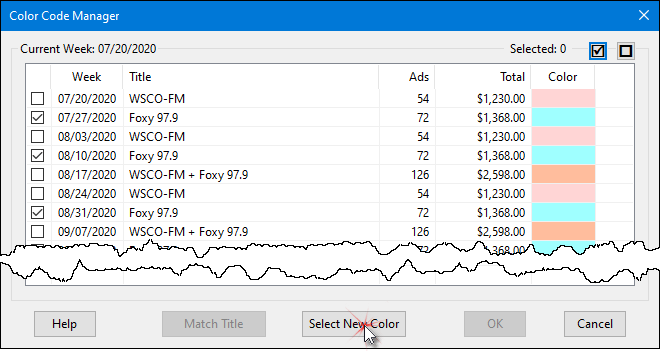
The Color Code Manager displays all the active weeks of the schedule and any colors assigned to those weeks. Using the left mouse button, place a check mark next to one or more weeks listed, then click Select New Color to display the Choose Color window. The small buttons on the upper right of the window allow you to select/deselect all weeks.
To quickly match multiple weeks with the same Week Title, left click on a title to highlight the entire line, then click the Match Title button to select all weeks with the same title. The effect of the Match Title is cumulative.
Hold down Ctrl or Shift when clicking weeks (not individual check boxes) with the mouse to highlight a group of weeks, then click the check button ![]() to check only those highlighted weeks.
to check only those highlighted weeks.
Once all color assignments are complete, click OK to make them permanent and close the window. Click Cancel to close the window and abandon all color changes, retaining the original color assignments.